
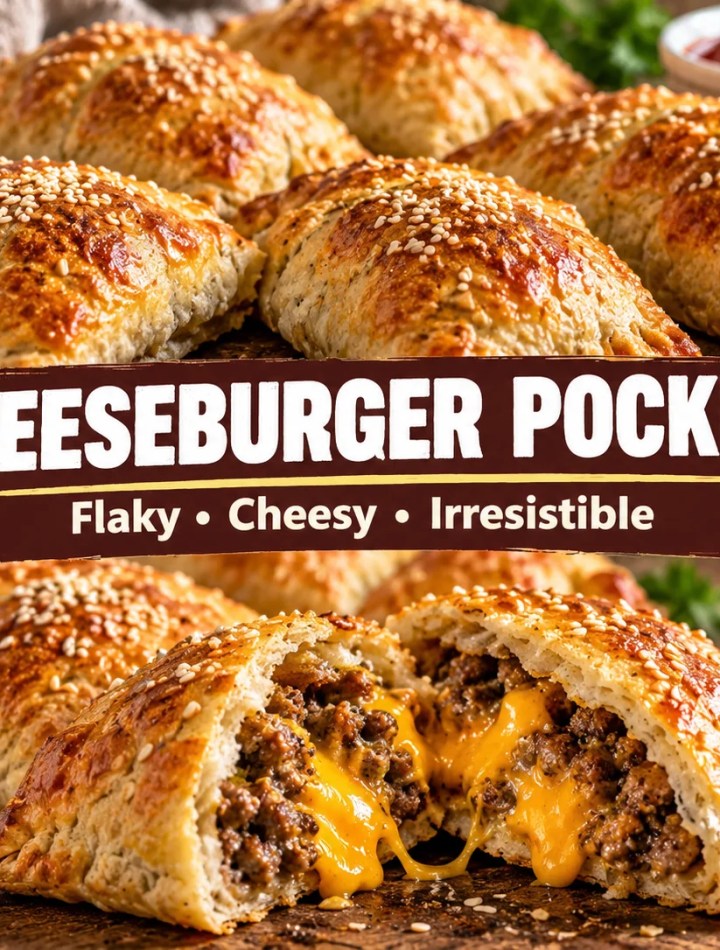
Cheeseburger Pockets
Cheeseburger pockets take everything you like about a classic cheeseburger — seasoned beef, melted cheese, ketchup, mustard — and fold it into golden, flaky dough you can eat with your hands. They come together with a skillet, one bowl, and a can of refrigerated crescent dough, which makes this one of those dinners that looks like more effort than it actually takes.
This version uses a simple beef-and-onion filling seasoned with the same condiments that make a burger taste like a burger, tucked into crescent dough and sealed into a turnover shape. A quick egg wash and a sprinkle of sesame seeds on top give them a bakery-style finish, though that part is entirely optional.
Why You’ll Love This Recipe
- No fork required. These are a full cheeseburger dinner you can eat with your hands.
- Uses convenience dough. Refrigerated crescent dough means no dough-making and a short ingredient list.
- Freezer-friendly both ways. Freeze them baked for quick reheats or unbaked for a future dinner.
- Kid-approved. The classic ketchup-and-mustard flavor makes this an easy sell for picky eaters.
- Portable. Great for lunchboxes, road trips, or eating on the go.


Cheeseburger Pockets
Ingredients
Equipment
Method
- Preheat oven to 375°F; line a baking sheet with parchment.
- Brown beef with onion, salt, and pepper, 6–8 minutes, until beef reaches 160°F internally. Drain fat.
- Off heat, stir in ketchup, mustard, Worcestershire, and pickles if using. Cool 5 minutes.
- Unroll crescent dough; press seams together to form 6 rectangles.
- Spoon ⅓ cup filling onto half of each rectangle; top with cheese.
- Fold dough over filling; seal edges firmly with a fork.
- Brush tops with egg wash, sprinkle with sesame seeds, and prick tops 2–3 times to vent.
- Bake 15–18 minutes until golden brown. Rest 5 minutes before serving.
Notes
Seal the edges firmly with a fork all the way around, including the corners — this is the main fix for leaking filling.
Don't skip venting. Prick the top of each pocket 2–3 times with a fork before baking. Without this, steam builds up and the pockets can burst open.
Don't overfill — about ⅓ cup of filling per pocket seals cleanly.
Drain the beef well so the bottom of the dough bakes crisp instead of soggy.
Make ahead: Assemble, egg wash, and vent up to 24 hours ahead; refrigerate and bake straight from the fridge, adding a couple extra minutes.
Freezer-friendly: Freeze baked pockets up to 3 months, or unbaked (fully assembled and vented) up to 1 month — bake from frozen, adding 8–10 minutes.
Reheat: Oven at 350°F for 8–10 minutes, or air fryer at 350°F for 4–5 minutes, for the crispest results.
Mini/party version: Cut dough rectangles in half, use 2–3 tablespoons filling per pocket, and reduce bake time to about 12 minutes.
Nutrition values are estimates and will vary by brand and exact portion size.
How to Make Cheeseburger Pockets
- Preheat and prep. Preheat your oven to 375°F. Line a baking sheet with parchment paper.
- Cook the beef. Heat a large skillet over medium heat. Add the ground beef, chopped onion, salt, and pepper. Cook, breaking the beef into small crumbles, for 6–8 minutes, until fully browned, the onion is soft, and no pink remains. Confirm with a meat thermometer that the beef has reached at least 160°F, the USDA-recommended safe internal temperature for ground beef. Drain any excess fat.
- Add the burger flavor. Off the heat, stir in the ketchup, mustard, Worcestershire sauce, and diced pickles if using. Let the mixture cool for about 5 minutes so it doesn’t melt or soften the dough during assembly.
- Prepare the dough. Unroll the crescent dough. Press the perforated seams together firmly to form solid rectangles (you should get 6 rectangles total from the two cans). If the dough feels thin or tears easily, roll it very gently with a rolling pin to smooth and slightly thicken the seams.
- Fill the pockets. Spoon about ⅓ cup of the beef mixture onto one half of each dough rectangle, leaving a ½-inch border around the edges. Top the filling with shredded cheddar (or a slice of American cheese).
- Seal. Fold the empty half of the dough over the filling to form a rectangle or turnover shape. Press the edges firmly with the tines of a fork to seal completely — this is the step that determines whether the filling stays inside during baking, so press all the way around, including the corners.
- Vent and finish. Transfer the pockets to the prepared baking sheet. Brush the tops with the beaten egg and sprinkle with sesame seeds if using. Prick the top of each pocket 2–3 times with a fork. This venting step lets steam escape as the pockets bake; skipping it is the most common reason pockets puff up and burst open in the oven.
- Bake. Bake for 15–18 minutes, until deep golden brown on top.
- Rest and serve. Let the pockets cool for 5 minutes before serving — the cheese and filling stay very hot right out of the oven.
Recipe Tips
- Cool the filling before assembling. Five minutes is enough. Hot filling softens the dough and makes it harder to seal.
- Seal the edges thoroughly. Press the fork tines firmly around the entire border, including the corners, where leaks are most likely to start.
- Don’t skip venting. A few fork pricks in the top let steam escape and prevent the dough from splitting open.
- Don’t overfill. About ⅓ cup of filling per pocket is enough for a clean seal; more filling makes sealing harder and increases the odds of a leak.
- Drain the beef well. Excess grease left in the filling can make the bottom of the dough soggy instead of crisp.
Common Mistakes to Avoid
- Skipping the vent holes. This is the single most common cause of burst-open pockets, according to home cooks and recipe developers who’ve made this dish repeatedly.
- Under-sealing the edges. A light press isn’t enough — press firmly all the way around with a fork.
- Assembling with hot filling. This softens and can tear the dough before it even goes in the oven.
- Skipping the beef temperature check. Confirm the beef reaches 160°F in the skillet rather than assuming the bake finishes the job.
- Overcrowding the baking sheet. Leave at least an inch between pockets so they bake evenly and don’t fuse together.
Variations
- Bacon cheeseburger pockets: Add ¼ cup cooked, crumbled bacon to the filling.
- Mini cheeseburger pockets for game day: Cut each dough rectangle in half before filling, using about 2–3 tablespoons of filling per pocket, to make 12 smaller party-size pockets. Reduce bake time to about 12 minutes.
- Biscuit dough version: Substitute refrigerated buttermilk biscuits, rolled into 5-inch ovals, for the crescent dough (as in the classic diner-style version of this recipe). Expect a thicker, bread-like texture and a slightly longer bake time.
- Puff pastry pockets: Use thawed puff pastry sheets cut into squares, folded into triangles instead of rectangles, for a flakier, more pastry-like result.
- Air fryer method: Air fry at 350°F for 8–10 minutes, checking at 7 minutes, until golden brown, working in batches to avoid crowding.
- Jalapeño cheeseburger pockets: Add 1–2 tablespoons finely diced jalapeño to the filling and swap in pepper jack cheese.
What to Serve With It
- Oven fries or sweet potato fries
- A simple green salad or coleslaw
- Extra burger sauce (mix mayo, ketchup, and mustard) or ranch for dipping
- Pickle spears
- A vegetable tray, if serving the mini version for a party
Storage
- Refrigerator: Store cooled, baked pockets in an airtight container for up to 3–4 days.
- Freezer (baked): Freeze cooled pockets in a single layer until solid, then transfer to a freezer-safe bag or container for up to 3 months.
- Freezer (unbaked): Assemble and seal the pockets (including venting and egg wash), freeze on a tray until solid, then transfer to a freezer bag for up to 1 month. Bake from frozen, adding 8–10 minutes to the bake time.
Reheating
- Oven: Reheat at 350°F for 8–10 minutes, until warmed through and the crust is crisp again.
- Air fryer: Reheat at 350°F for 4–5 minutes for the crispest results.
- Microwave: Works in a pinch (about 45–60 seconds per pocket) but will soften the dough rather than keep it crisp.
Make Ahead
Assemble the pockets fully, including the egg wash and venting, up to 24 hours in advance. Cover tightly and refrigerate, then bake straight from the fridge, adding a couple of extra minutes to the bake time.
Frequently Asked Questions
Why do I need to prick the tops with a fork? Venting lets steam escape as the pockets bake. Without it, steam builds up inside the sealed dough and can cause the pockets to puff up and burst open.
Can I use biscuit dough instead of crescent dough? Yes. Roll refrigerated buttermilk biscuits into ovals instead of using crescent dough for a thicker, more bread-like pocket. This is closer to the classic diner-style version of the recipe.
Why did my cheeseburger pocket leak filling? This usually comes down to under-sealed edges or filling that was too hot when assembled, which softens the dough. Press the fork seal firmly all the way around, including the corners.
Can I use ground turkey instead of ground beef? Yes — use 93/7 ground turkey or higher fat content for the best texture, since leaner turkey can make the filling dry.
Are cheeseburger pockets freezer-friendly? Yes, both baked and unbaked pockets freeze well. See the Storage section above for full instructions.
Can I make a smaller, party-size version? Yes. Cut the dough rectangles in half and use about 2–3 tablespoons of filling per pocket for a game-day-friendly size, reducing the bake time to about 12 minutes.
What’s the best cheese for cheeseburger pockets? American cheese gives the smoothest, most classic diner-style melt, while shredded cheddar adds a sharper cheese flavor. Both work well.
More Recipes to Try
Looking for another meal idea? Explore these recipes from Recipe Whisp:


